Bring a “ghoul” platter of cupcakes to your office or neighborhood party and get those skeletons out of the closet! It’s easy to do when you remember that “the leg bone’s connected to the knee bone and the knee bone’s connected to the foot bone”, as the song goes. You’ll have your skeletons dancing across your cupcakes in no time.
For the Black & Orange Cupcakes
Ingredients:
Vanilla Cake Mix – use your favorite brand & follow package directions
Almond Extract
Black & Orange Gel Food Color
Chocolate Buttercream Frosting (recipe below)
Directions:
Mix cake according to the directions on the package. Add ¼ teaspoon almond extract to the batter. Divide batter into 2/3 and 1/3 portions, pouring them into two separate bowls. Into 2/3 of the batter mix the orange gel food coloring and beat well. Into the 1/3 portion of batter mix the black gel food coloring and beat well. Using large spoons – such as tablespoons or soup spoons – layer the colored batters into the cupcake cups until they are 2/3 full.
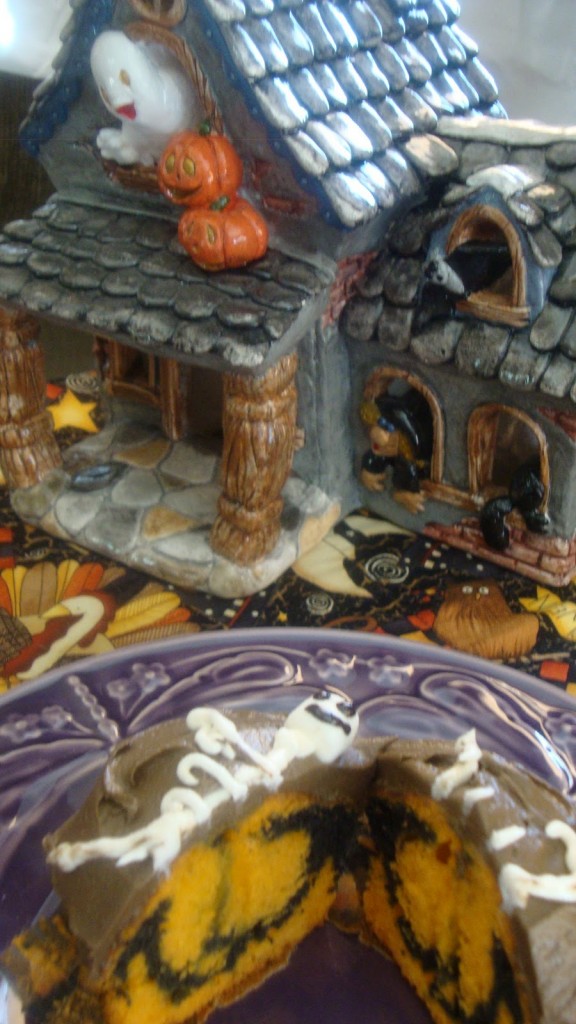
Start with the orange batter first , then a spoon of black batter and then top with the orange batter. This combo gives you the best color swirls. Take a butter knife and gently swirl the colors together gently. Don’t mix them too much or you will lose the design and just have grayish cupcakes! The key is to create a few swirls within the batter so that you have large swirls of color when you bite into them.
Place pan in oven on center rack. Bake for about 20 minutes, or until a toothpick comes out clean. Cool on a rack for five minute before removing cupcakes from pan. Allow cupcakes to cool completely on rack before frosting. Frost cupcakes with chocolate frosting and let frosting set.
For the Skeleton Decorations
Ingredients:
White frosting (recipe below)
Wilton Black Gel Frosting in tube (Michaels)
Mini Marshmallows
Easy Chocolate Buttercream Frosting
Ingredients:
3 cups confectioners’ sugar
1 cup butter, softened
8 ounces unsweetened chocolate, melted
2 teaspoons instant espresso powder
1 teaspoon vanilla extract
2 to 3 tablespoons heavy cream
Directions:
Melt chocolate chips in glass bowl over pot of hot water; stir until smooth. Add espresso powder to the melted chocolate. Set aside; cool 15 minutes. In a standing mixer fitted with a whisk, mix together sugar and butter. Mix on low speed until well blended and then increase speed to medium and beat for another 3 minutes. Add vanilla and cream and continue to beat on medium speed for 1 minute more, adding more cream if needed for spreading consistency. Divide frosting by 1/4 vanilla frosting into one bowl and set aside. To the other 3/4 vanilla frosting, add the melted chocolate to make the chocolate frosting.
To Decorate Skeleton Cupcakes Instructions:
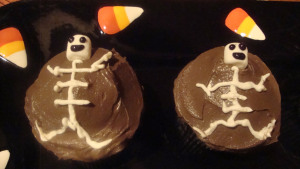
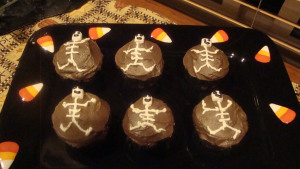
Place a mini marshmallow on each of the cupcake as the head and then start drawing on the skeleton body. Start with the neck and spine and then add on the bones using wiggly lines with balls on each end to create “bones” and at each “joint” of arms and legs. Add a couple of short horizontal lines for ribs. Use the picture as a guideline, but be creative and make your skeleton dance.
Using an icing bag fitted with a small round tip, pipe on a stick figure or you can put frosting/icing into a sandwich size plastic bag, seal and then snip off the very end of one corner of the bag with a scissors to create an icing bag for piping on your skeleton designs. Make sure you snip off a very small piece so that your lines will be fine. You can always snip off more if you need to.
Finish off the skeletons by drawing on his face with the black gel frosting.

- Vanilla Cake Mix – use your favorite brand & follow package directions
- Almond Extract
- Black & Orange Gel Food Color
- Chocolate Buttercream Frosting (recipe below)
- White frosting (recipe below)
- Wilton Black Gel Frosting in tube (Michaels)
- Mini Marshmallows
- Easy Chocolate Buttercream Frosting
- 3 cups confectioners' sugar
- 1 cup butter, softened
- 8 ounces unsweetened chocolate, melted
- 2 teaspoons instant espresso powder
- 1 teaspoon vanilla extract
- 2 to 3 tablespoons heavy cream
- For the Black & Orange Cupcakes: Mix cake according to the directions on the package. Add ¼ teaspoon almond extract to the batter. Divide batter into 2/3 and 1/3 portions, pouring them into two separate bowls. Into 2/3 of the batter mix the orange gel food coloring and beat well. Into the 1/3 portion of batter mix the black gel food coloring and beat well.
- Using large spoons – such as tablespoons or soup spoons – layer the colored batters into the cupcake cups until they are 2/3 full. Start with the orange batter first , then a spoon of black batter and then top with the orange batter. This combo gives you the best color swirls. Take a butter knife and gently swirl the colors together gently. Don’t mix them too much or you will lose the design and just have grayish cupcakes! The key is to create a few swirls within the batter so that you have large swirls of color when you bite into them.
- Place pan in oven on center rack. Bake for about 20 minutes, or until a toothpick comes out clean.
- Cool on a rack for five minute before removing cupcakes from pan. Allow cupcakes to cool completely on rack before frosting.
- For the Skeleton Frosting Decorations: Melt chocolate chips in glass bowl over pot of hot water; stir until smooth. Add espresso powder to the melted chocolate. Set aside; cool 15 minutes.
- In a standing mixer fitted with a whisk, mix together sugar and butter. Mix on low speed until well blended and then increase speed to medium and beat for another 3 minutes.
- Add vanilla and cream and continue to beat on medium speed for 1 minute more, adding more cream if needed for spreading consistency.
- Divide frosting by 1/4 vanilla frosting into one bowl and set aside. To the other 3/4 vanilla frosting, add the melted chocolate to make the chocolate frosting.
- Frost cupcakes with chocolate frosting and let frosting set.
- To Decorate Skeleton Cupcakes: Place a mini marshmallow on each of the cupcake as the head and then start drawing on the skeleton body. Start with the neck and spine and then add on the bones using wiggly lines with balls on each end to create “bones” and at each “joint” of arms and legs. Add a couple of short horizontal lines for ribs. Use the picture as a guideline, but be creative and make your skeleton dance.
- Using an icing bag fitted with a small round tip, pipe on a stick figure or you can put frosting/icing into a sandwich size plastic bag, seal and then snip off the very end of one corner of the bag with a scissors to create an icing bag for piping on your skeleton designs. Make sure you snip off a very small piece so that your lines will be fine. You can always snip off more if you need to.
- Finish off the skeletons by drawing on his face with the black gel frosting.

